
GE Profile Self-Cleaning Oven Manual: A Comprehensive Guide
This manual details operation, safety, and maintenance for your GE Profile oven, including self-cleaning features, troubleshooting, and utilizing advanced settings for optimal performance.
Understanding Your GE Profile Oven
Your GE Profile oven represents a significant investment in culinary convenience and precision. This appliance is engineered with advanced features, including self-cleaning technology, designed to simplify kitchen tasks and deliver consistently excellent results. Familiarizing yourself with its components and capabilities is crucial for safe and effective operation.
The oven’s construction incorporates high-quality materials, such as catalytic enamel on self-cleaning models, which aids in grease breakdown during normal cooking temperatures. Regular cleaning, even with self-cleaning features, is recommended to maintain peak performance. Understanding the interplay between the oven’s heating elements, temperature sensors, and control panel is key to mastering its functions.
This manual serves as a comprehensive resource, guiding you through each aspect of your oven, from initial setup to advanced techniques. Proper usage ensures longevity and maximizes your cooking experience. Always prioritize safety and adhere to the precautions outlined within this guide.
Model Number Identification
Locating your GE Profile oven’s model number is essential for accessing accurate support, ordering replacement parts, and downloading specific documentation. The model number provides critical information about your oven’s features and specifications. It’s typically found on a label affixed to the frame of the oven, visible when the door is open.
This label is usually located on the side wall of the oven cavity, or on the back panel. The model number is a combination of letters and numbers, uniquely identifying your specific appliance configuration. Record this number in a safe place for future reference.
When contacting GE customer service or searching for information online, having the model number readily available will expedite the process. It ensures you receive the correct assistance and resources tailored to your oven. Refer to your warranty information, as the model number is also included there.
Safety Precautions
Prioritize safety when operating your GE Profile self-cleaning oven. Always ensure the oven is cool before cleaning, preventing burns from hot surfaces. Never use abrasive cleaners or harsh chemicals, as they can damage the oven’s interior. Keep flammable materials away from the oven during operation and self-clean cycles.
Supervise children closely when the oven is in use. The exterior surfaces become hot during baking and broiling. Avoid touching heating elements or the oven interior immediately after use. Disconnect the power supply before performing any maintenance or repairs.
During the self-clean cycle, the oven reaches extremely high temperatures. Do not open the door until the cycle is complete and the oven has cooled. Ensure adequate ventilation during self-cleaning to dissipate fumes. Read all warnings and instructions in this manual before operating the appliance.
Oven Features Overview
Your GE Profile oven boasts a range of features designed for convenient and efficient cooking. Key highlights include self-cleaning panels utilizing catalytic enamel to aid grease breakdown at normal temperatures. The oven offers multiple baking modes, providing versatility for various recipes. A precise temperature control system ensures consistent results.
Explore the temperature probe for accurate cooking of meats and roasts. Convection baking technology promotes even heat distribution, reducing cooking times. The control panel provides intuitive access to all functions. The oven interior is designed for easy cleaning, even outside of the self-clean cycle.
Additional features may include a delay start function for pre-programmed cooking and a Sabbath mode for adhering to religious practices. The oven door features a viewing window for monitoring progress without heat loss.

Using Your GE Profile Oven
Mastering your oven involves understanding the control panel, selecting appropriate baking modes, and utilizing broiling techniques for delicious results every time.
Control Panel Functions
The GE Profile oven’s control panel is designed for intuitive operation, offering a range of features at your fingertips. Digital displays clearly show temperature and cooking time, while tactile buttons allow for precise adjustments. Explore the various mode selections – Bake, Broil, Convection Bake, and more – each optimized for specific culinary tasks.
Utilize the temperature probe function for accurate internal food temperature monitoring, ensuring perfectly cooked meals. The Delay Start option allows convenient scheduling, initiating cooking at a pre-set time. Familiarize yourself with the self-clean cycle initiation and duration settings. Remember to consult the manual for specific button functions and customization options.
Voice control integration, via Google Nest, may be available on select models, enabling hands-free operation. Understanding these functions unlocks the full potential of your GE Profile oven, simplifying your cooking experience and delivering consistently excellent results.
Baking Modes Explained
Your GE Profile oven offers diverse baking modes tailored to various recipes and preferences. Traditional Bake utilizes heat from lower and upper elements for even cooking. Convection Bake employs a fan to circulate hot air, reducing cooking times and ensuring consistent results – ideal for multiple racks. Broil delivers intense, direct heat from above, perfect for searing and browning.
Explore specialized modes like Proof, designed for optimal yeast dough rising, and Keep Warm, maintaining food temperature without overcooking. Some models feature Steam Bake for achieving crusty breads and pastries. Understanding each mode’s function is crucial for optimal performance.
Experiment with different settings to discover which best suits your culinary creations. Refer to your recipe and the oven manual for recommended modes and temperatures. Mastering these modes unlocks the full potential of your GE Profile oven, guaranteeing delicious outcomes.
Broiling Techniques
Broiling utilizes intense, direct heat from the upper element, ideal for quickly searing, browning, and finishing dishes. Position the oven rack appropriately – closer for faster cooking, further away for slower, more even results. Always use broil-safe cookware, such as metal or oven-safe glass. Avoid plastic or flammable materials.
For optimal results, pat food dry before broiling to promote browning. Monitor closely, as broiling happens rapidly, and food can burn quickly. Turn food halfway through the broiling time for even cooking. Utilize the low broil setting for delicate items or to prevent excessive browning.
Remember to leave the oven door slightly ajar during broiling to prevent overheating and ensure proper ventilation. Always exercise caution when handling hot cookware and food after broiling.
Temperature Settings & Calibration
Your GE Profile oven offers precise temperature control for consistent cooking results. Temperatures are displayed digitally and can be adjusted in increments. Ensure accurate baking by verifying oven temperature with an oven thermometer. If discrepancies exist, calibration is necessary.
To calibrate, access the oven’s settings menu via the control panel. Follow the on-screen prompts to adjust the displayed temperature up or down to match the thermometer reading. Small adjustments are recommended. Repeat the process if needed to achieve accuracy.
Consistent temperature is crucial for successful baking and roasting. Calibration ensures your oven operates as intended, delivering predictable and delicious outcomes. Regularly check calibration, especially after prolonged use or a power outage.

Self-Cleaning Cycle: A Detailed Look
The self-clean cycle utilizes high temperatures to efficiently burn away food residue, simplifying oven maintenance and eliminating the need for manual scrubbing.
Preparing for the Self-Clean Cycle
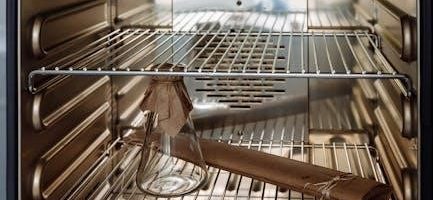
Before initiating the self-clean cycle on your GE Profile oven, thorough preparation is crucial for optimal results and safety. First, remove all oven racks, broiler pans, and any aluminum foil, cookware, or temperature probes from the oven cavity. These items can become damaged during the high-heat cleaning process. Wipe up any large spills or loose debris from the oven floor, as these can create excessive smoke.
Ensure the oven door can fully close and latch securely; the cycle will not start if the door is ajar. Verify that the kitchen is well-ventilated, as the self-clean cycle can produce odors. It’s advisable to open windows or use the exhaust fan. Finally, remember that the exterior of the oven will become very hot during the cycle, so keep children and pets away from the appliance. Do not attempt cleaning until the cooker has completely cooled down, as stated in safety guidelines.
Initiating the Self-Clean Cycle
To begin the self-clean cycle on your GE Profile oven, first ensure all preparatory steps are completed – racks removed, oven wiped clean, and door securely latched. Access the self-clean function through the control panel; typically, a “Self Clean” button will initiate the process. You may be prompted to select a clean level, ranging from light to heavy soil, or a cycle duration.
Some models offer a delayed start option, allowing you to schedule the cleaning cycle for a convenient time. Once selected, press “Start” to activate the cycle. The oven door will automatically lock for safety during the high-temperature cleaning process. Do not attempt to open the door until the cycle is complete and the lock has released. The oven will heat to extremely high temperatures, so maintain a safe distance. Monitor the cycle’s progress, though direct observation isn’t necessary.
Self-Clean Cycle Duration & Monitoring
The duration of the self-clean cycle on your GE Profile oven varies depending on the selected soil level – typically ranging from 2 to 4 hours; Lighter soil requires shorter cycles, while heavily soiled ovens necessitate longer cleaning times. During the cycle, the oven maintains extremely high temperatures, effectively burning off food residue.
While direct monitoring isn’t crucial, some models display the cycle’s progress on the control panel. Avoid opening the oven door during operation, as this disrupts the cleaning process and poses a safety hazard. A locking mechanism prevents accidental opening. Be aware of potential odors during the cycle, which are normal due to the burning of food particles; ensure adequate ventilation. Once completed, the oven will cool, and the door lock will automatically release.
Post-Self-Clean Cycle Procedures
After the self-clean cycle completes and the oven has cooled completely, a fine white residue may be visible. This is normal and is simply ash from the burned food particles. Allow the oven to cool entirely before attempting to remove it.
Wipe away the residue with a damp cloth; avoid abrasive cleaners, as they can damage the oven’s interior. Inspect the oven racks and broiler pan – they may also have residue and should be cleaned separately; Ensure the oven door lock has fully disengaged before use. If any lingering odors remain, ventilate the kitchen. Regular post-clean inspection helps maintain optimal oven performance and prevents future buildup.

Oven Maintenance & Cleaning (Non-Self-Clean)
Regular cleaning, using water or non-aggressive liquids, maintains oven performance and appearance; avoid harsh abrasives on interior surfaces and the oven door.
Regular Oven Cleaning Schedule
Maintaining a consistent cleaning schedule is crucial for optimal oven performance and longevity. After each use, wipe down spills immediately with a damp cloth to prevent baked-on residue. A more thorough cleaning should be performed weekly, focusing on the oven interior, door, and racks.
For weekly cleaning, remove racks and the broiler pan. Wash these components with warm, soapy water. The oven interior can be cleaned with a non-abrasive cleaner specifically designed for ovens, or a paste of baking soda and water. Avoid harsh chemicals that could damage the enamel.
Monthly, inspect the oven door seals for any damage or buildup. Clean the seals with a damp cloth to ensure a tight seal during cooking. A deep clean, including a manual scrub of the oven interior, should be scheduled every three months, or as needed based on usage. Consistent attention prevents significant buildup and simplifies the cleaning process.
Cleaning Oven Racks & Broiler Pan
Properly cleaning oven racks and the broiler pan is essential for maintaining hygiene and preventing smoke during cooking. Begin by removing the racks and broiler pan from the oven after it has completely cooled. For baked-on food residue, soak the racks and pan in a solution of hot, soapy water for several hours, or overnight for stubborn stains.
After soaking, use a non-abrasive scrub brush or sponge to remove any remaining debris. Avoid using steel wool or harsh scouring pads, as these can damage the finish. For particularly difficult spots, create a paste of baking soda and water and apply it to the affected areas, letting it sit before scrubbing.
Rinse thoroughly with clean water and dry completely before returning them to the oven. The broiler pan may also be cleaned in a dishwasher if it is dishwasher-safe; check your oven’s manual for confirmation.

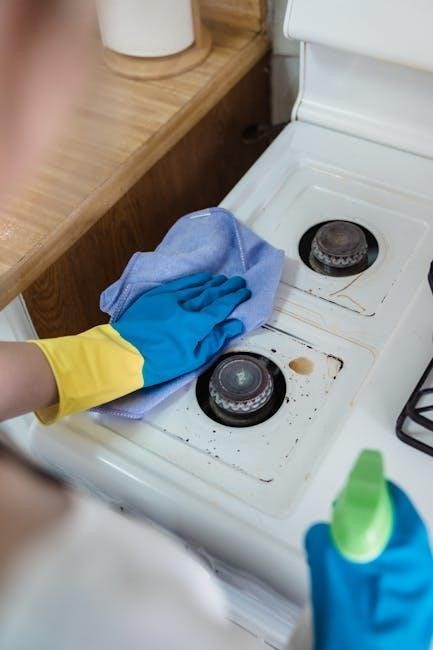
Cleaning the Oven Door
Maintaining a clean oven door is crucial for visibility and overall oven appearance. Begin by wiping down the exterior of the door with a soft cloth dampened with warm, soapy water. For fingerprints or light smudges, a glass cleaner can be used effectively. Avoid abrasive cleaners, as they can scratch the glass surface.
To clean between the glass panes, some GE Profile models allow for door panel removal – consult your specific model’s manual for instructions. If removable, carefully detach the panel and clean both sides with glass cleaner and a soft cloth.
For baked-on spills inside the door, a paste of baking soda and water can be applied, left to sit, and then gently scrubbed. Ensure all cleaning solutions are thoroughly rinsed away with a damp cloth and the door is dried before use.
Cleaning the Oven Interior (Manual Cleaning)
For ovens not utilizing the self-clean function, or for quick clean-ups, manual cleaning is effective. First, ensure the oven is completely cool. Remove oven racks and the broiler pan. Create a paste using baking soda and water – a ratio of approximately 3 parts baking soda to 1 part water works well.
Apply the paste generously to all interior surfaces, avoiding heating elements and ventilation openings. Allow the paste to sit for at least 20 minutes, or even overnight for stubborn stains.
Using a damp sponge or cloth, gently scrub the interior, focusing on areas with baked-on residue. Rinse thoroughly with clean water, removing all traces of baking soda. Dry the interior with a clean cloth before replacing racks and resuming oven use.

Troubleshooting Common Issues
This section addresses frequent problems like heating failures, self-clean malfunctions, error codes, and temperature inaccuracies, offering solutions for a smoothly functioning oven.
Oven Not Heating
If your GE Profile oven isn’t heating, first verify the power supply – ensure the oven is properly plugged in and the circuit breaker hasn’t tripped. Check the control panel to confirm the oven is set to a baking or broiling mode, and that a temperature has been selected. A faulty oven temperature sensor can also prevent heating; if suspected, it may require replacement by a qualified technician.
Inspect the bake element (located at the bottom of the oven) and the broil element (at the top) for any visible signs of damage, such as blistering or breaks. A damaged element will need to be replaced. Sometimes, a simple control panel lock can inadvertently disable oven functions – ensure the lock feature is deactivated. If the issue persists after these checks, consult a GE appliance service professional for diagnosis and repair, as internal wiring or control board issues may be present. Remember safety first – never attempt repairs yourself if you are uncomfortable or unqualified.
Self-Clean Cycle Not Working
If the self-clean cycle on your GE Profile oven fails to initiate, ensure the oven door is completely latched and locked. The oven won’t start the cycle if the door isn’t securely closed. Verify that the oven interior is free of large debris or excessive grease buildup, as this can sometimes interfere with the process. Check your model’s manual for specific self-clean cycle requirements, as some models have limitations on rack placement during cleaning.
A tripped circuit breaker can also prevent the cycle from starting; reset if necessary. If the control panel displays an error code, consult the error code section of this manual for troubleshooting steps. A faulty door lock mechanism or temperature sensor could also be the cause; these components may require professional inspection and repair. Never attempt to force the self-clean cycle if it’s not functioning correctly, and always ensure adequate ventilation during operation.
Error Codes & Their Meanings
GE Profile ovens utilize error codes to diagnose internal issues. A code like “F1” often indicates a temperature sensor failure, requiring professional service. “F2” may signal a faulty heating element, preventing the oven from reaching set temperatures. “F3” typically points to a control board malfunction, potentially impacting multiple functions. “F4” can indicate a door lock issue, preventing the self-clean cycle from starting.
“F5” often relates to communication errors within the oven’s system. Always consult your specific model’s manual for a complete list of error codes and their corresponding solutions. Attempting repairs based on generalized information can be risky. If an error code persists after power cycling the oven, or if you are uncomfortable diagnosing the issue, contact a qualified appliance repair technician for assistance. Ignoring error codes can lead to further damage.
Temperature Inaccuracies
If your GE Profile oven isn’t maintaining the set temperature, several factors could be at play. A miscalibrated oven is a common cause; refer to the “Temperature Settings & Calibration” section for adjustment instructions. A faulty oven temperature sensor can also deliver incorrect readings to the control board. Check for proper door sealing – gaps allow heat escape, impacting internal temperature.
Ensure the oven isn’t overcrowded, as this can disrupt airflow and lead to uneven heating. Verify the correct baking mode is selected for your recipe. If inaccuracies persist after calibration and troubleshooting, a failing heating element or control board may require professional attention. Using an oven thermometer to independently verify the internal temperature is recommended for accurate assessment.

Additional Features & Settings
Explore advanced functionalities like the temperature probe, convection baking, delay start, and Sabbath mode to customize your cooking experience with your GE Profile oven.
Temperature Probe Usage
The GE Profile oven’s temperature probe allows for precise cooking, especially beneficial for larger roasts and poultry. To use, insert the probe into the thickest part of the food, ensuring it avoids bone. Connect the probe to the oven’s designated port.
Within the control panel, select the “Temperature Probe” option and set your desired final internal temperature. The oven will automatically shut off when this temperature is reached, preventing overcooking. Regularly clean the probe with a damp cloth and mild detergent; avoid submerging the probe’s connection point in water.

Proper probe placement is crucial for accurate readings. For best results, center the probe within the food mass. Remember to always consult recipe guidelines for recommended internal temperatures. Utilizing the temperature probe guarantees perfectly cooked meals every time, enhancing your culinary creations with ease and precision.
Convection Baking Explained

GE Profile ovens feature convection baking, utilizing a fan to circulate hot air throughout the oven cavity. This results in faster, more even cooking compared to traditional baking methods. Convection is ideal for baking multiple trays of cookies, roasting meats, and achieving crispy textures.
When using convection, reduce the recipe temperature by 25°F (15°C) and check for doneness slightly earlier than the recommended time. The convection setting ensures consistent heat distribution, eliminating hot and cold spots.
For optimal results, avoid overcrowding the oven, allowing sufficient space for air circulation. Experiment with convection baking to discover its benefits for various recipes. It’s perfect for achieving golden-brown crusts and thoroughly cooked interiors, elevating your baking and roasting experiences.
Delay Start Function
The GE Profile oven’s Delay Start function allows you to pre-program the oven to begin cooking at a later time. This is incredibly convenient for meal preparation, enabling you to set the oven before leaving for work or starting your day. Simply input your desired cooking time and set the ‘Start Delay’ time.
Ensure food is placed inside the oven before activating the delay start, especially perishable items. The oven will automatically begin cooking at the programmed time, providing a freshly cooked meal upon your return.
Remember to consider food safety guidelines when using the delay start function, particularly with meats and poultry. Do not use the delay start with recipes requiring precise timing or immediate attention.
Sabbath Mode Operation
The Sabbath Mode on your GE Profile oven is designed to comply with Jewish Sabbath observance guidelines. When activated, this mode disables several oven functions to adhere to traditional restrictions. Specifically, the oven will maintain a consistent temperature once set, preventing automatic shut-off or temperature fluctuations during the Sabbath.
To engage Sabbath Mode, consult your oven’s control panel instructions – typically involving a specific button combination. The display will dim, and the oven will operate continuously at the selected temperature for the duration specified.
Important: Do not open the oven door unnecessarily during Sabbath Mode, as this may disrupt the temperature and potentially violate Sabbath restrictions. Refer to your complete manual for detailed instructions and safety precautions regarding Sabbath Mode operation.